Saturday, March 31, 2012

Buttons + Paint = Funky Art

What do you get when you mix buttons and paint and imagination?  Why, you get art of course!


These button painting are made by taking a blank canvas, adding paint, mixed with a bit of imagination, a smidgen of creativity and a few buttons.  Presto, chango, you have art!

The paint I used was a combination of the acrylic paint that can be purchased at any craft store, and some oops sample paint I bought on clearance at my local hardware store. (I love a good bargain!)


First, let's create the background by taking the darker paint and then blending it with the lighter paint.  You'll want to work rather quickly, as acrylic paint dries pretty fast, and once it's dried, it's set.  With the paint wet, you'll add each color, one at a time, blending one color into the next, avoiding any sharp lines of color.


Until finally, you have a blended color background.


Set it aside and let it dry completely.

(Since I was working on several of these at one time, you'll notice the backgrounds may be different in some of the following photos.  The technique though is the same.)

Okay, let's make the tree!  Using the acrylic craft paint, paint out your tree.  I like to use a contrasting color for the tree, and I learned the hard way that it's much easier to use a smaller brush to paint the trees than it is to use one too big.  (Although the smaller brush may take more time, it gives you more control of what your end result looks like.)

(Sorry for the glare on the pic!)


Once everything is dry, you can start selecting your buttons. 


You can use matching color buttons, or a mix of color buttons, or all the same type or same size--it's up to you. 

Before you glue your buttons, do a dry placement (without glue).  This allows you to decide where to place the buttons without smearing glue all over your painting.

A word about the glue.  I used simple craft glue (not something like Elmer's glue) that I picked up at my local craft store.  I don't think the brand matters as much, as long as it dries transparent!  Make sure your glue dries clear!!!!


What about those buttons with the little pieces on the back that raise them off the surface?  Take an Exacto knife (or razor blade) and put a little X-shaped hole in your canvas wherever you want your button to be. 

"CUT INTO MY CANVAS?!?!" you might be saying.  Yes, that's exactly what you want to do, but cut a tiny, itty-bitty X-shaped hole.  You can always cut larger if you need to.  You want a hole just big enough to slip the back of the button through it.


Once you have your button placement figured out, start gluing!  A little dab on the back of each button is all you need.  When the glue is dry, you're ready to move onto the next step--edging your art.

Unless I'm using a frame (which I'm not on these), I like to use black paint to give the edges a finished look.  Simply use black acrylic paint to paint the outside edges of the art.


Again, let everything dry.  When it's all dry, then it's ready to hang!

Blue background with yellow tree and mix of yellow and blue buttons.

Green background with dark brown three and mix of brown buttons and brown beads.

Red & yellow background with black tree and a mix of red and black buttons.

I like them hung together for a more dramatic impact.


Friday, March 23, 2012

Tubers in tubes--growing lots of potatoes in potato tubes


Remember those tomato cages we made?  Remember how I said they'd also work for potato tubes?

No? 

(Psssst!  You may want to read this post!)

Now you have the tomato cages-slash-potato tubes, so what's next?

Well, let's plant some potatoes!


Supplies you'll need for potato tubes:
  • Wire Potato tubes we built
  • Potatoes (see below)
  • Straw (we used about half a bale of straw for two tubes)
  • Compost and soil mixture (we used one bag of store bought compost and half a bag of top soil mix which filled about 3/4 of a potato tube)
  • Water

Could you plant the potatoes in the ground? Absolutely. Farmers and gardeners have planted potatoes in the ground since the beginning of potato planting time. Potatoes like to be planted in the ground. The ground likes having potatoes. It's a happy potato and ground family.

But, it also takes up space, and if you're limited on how much space you have, because you like planting, say...tomatoes, and peas, and squash and zucchini, and eggplants, and corn and...well, all that vegetable goodness, then planting space may be of demand.

With potato tubes, you can plant quite a bit more potatoes than if you'd planted them in the ground. (Some sources say up to 25 pounds of potatoes can grow in one of these things! But, I'm still in the experimental stage and haven't weighted the amount of potatoes yet.)

So, if you have one potato plant, stick it in the ground.  If you want to plant a lot of potatoes (and harvest a lot of potatoes), then you may want to consider using a potato tube. 

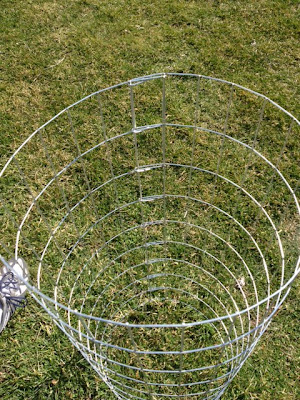
First, you'll need one (or more) of those nifty tomato cages/potato tubes we created.

And you'll need some potatoes.

You know those potatoes you have in the back of your pantry--the ones with the weird root things coming out of them?  (Those weird root things are called eyes.)  They'll work.

Or, you can buy some seed potatoes.  I have a mix of the weird rooted pantry potatoes and purple seed potatoes.

You need only one eye per potato to grow, so if you potato has more than one eye, then cut between the eyes (ouch!) and you'll have two potatoes to plant.  Let the cut pieces sit (or dry) for about 24 hours before planting though.


Now, about those potato tubes....

I strongly recommend using the straw to line the potato tubes.  The straw keeps the compost mixture in place, plus it helps keep the compost mixture moist and from drying out in the sun. 

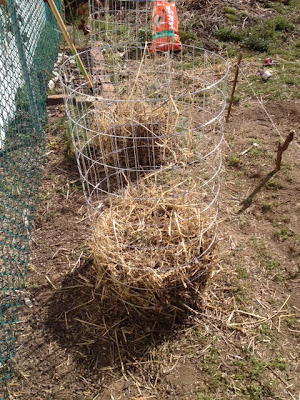
Take some of the straw and place it in the bottom of the potato tube--about 6-8 inches thick.  Bring it up a bit on the sides (about an inch or two), creating a "bowl" in which you'll add the compost mixture.


Next, place about 8-12 inches of the compost mixture in the bottom of the potato tube, breaking up any big chunks of compost. 


Next, place your potatoes in atop the compost mixture with the eyes facing towards the straw.  You want them fairly close to the straw (maybe even a bit closer than these were in the pic).  You can see that we had a mixture of purple and pantry potatoes.  (The two at 9:00 and 10-ish are the pantry potatoes.)


Add about 8-12 inches of soil to the top of the potatoes, and add more potatoes, building up the sides with the straw as you go. 

You really should water each layer, but I forgot until I'd finished and just soaked the potato tube really well. 

At the end, you'll have a potato tube as tall (or nearly as tall) as your wire tube.  You can either top with straw (to maintain the moisture), or plant some plants in there.  If I had some plants ready to be planted (like maybe some eggplant), I'd drop it in there.  I will once it's ready.


Now, about the potatoes growing...within a few weeks, you should notice greenery coming out the sides of your potato tubes.  (Sorry I don't have any pics yet because, well, mine haven't started sprouting yet.)  When will you have potatoes, you ask?

The potato greenery will get bushy.  Very bushy.  Don't go digging up the potatoes yet. 

Then, your potato greenery will get little white flowers.  Don't go digging up the potatoes yet.

Then, it will seem like your potatoes are starting to die.  You can dig up a few then.  (Start from the top and dig some out, leaving the potato greenery.)  By the end of the growing season, when your potato plants start to look like they're really starting to die, THEN you can dig out your potatoes.


Wednesday, March 21, 2012

Supporting your tomatoes--now's the time to start thinking about it


Remember all those little tomato seeds you planted?

Little seedlings:


Before you know it, they'll be in your garden and be huge tomato plants like this:


This picture was take summer of 2011 before the tomato plants fully developed.  See those tiny yellow flowers on them?  They are tomatoes-to-be. 

To support these plants, you'll need cages. 

Now, you can buy cages, but (1) the can be expensive, especially if you're buying several and (2) they can be flimsy, which means those cute little seedlings will grow into big plants that will bully flimsy tomato cages. 

This defeats the purpose of tomato cages, which is to support the tomato plant and keep it off the ground, where it can be at risk for too much moisture (which will cause disease and distress) or pests (like the naughty mole that ate my tomatoes last year because I didn't have them in cages).

So, let's talk about making cages to support your tomatoes.

First, is to get the materials you'll need. 

We used a wire garden fencing that you can get at any home improvement store or garden center.  Our was about four feet tall.

Word of advice:  USE GLOVES FOR WORKING WITH THIS WIRE!
My wonderful teen son did this for me (while I took the pictures) and you'll notice he's wearing his gloves. 

Unroll the wire to about four to five feet in length.  Then, use a pair of wire cutters or snipping shears to cut the wire.  You'll want to cut it so that you have pieces that you can later use to fold back.  Yes, these will look like little spikes and will ACT like little spikes if you're not careful.


You can see that the length is about 4 feet or so.

Next, roll it up so that the spikes cross over at least one row of the squares.  Then, you'll simply bend the spikes back to make a large loop that will catch the solid square.  Do this to all of the squares, since it will "latch" the ends together.


This is somewhat of a blurry pic, but you may be able to tell how the spike is now looped back in on itself, around the solid piece. 

When you're finished, you'll have a circle of wired fencing, perfect for a tomato plant.


Or a potato tube!


Oh, I didn't mention the potato tubes?

Hmmmm...I'll have to see what I can do about that!


Wednesday, March 14, 2012

Starting seeds: The Good, the Bad and the Dirty

How's your Spring Fever?  Yeah, mine, too. 

Depending on where you live, it's time to start seeds!  You have all your supplies, right? (If not, check out the post Spring Fever:  Preparing to Start Seeds.) Okay, let's begin!

I'm going to give the instructions to start seeds in the pellets because that's what I prefer to use.  It's less messy than dealing with starter mix, it's faster and I like the results I get.  However, you can use the starter mix and pots if you prefer.)

First, you'll need to figure out which seeds will go where.  I've decided that my squash, zucchini and red peppers will be started in the pellets, and in the plastic containers I've gotten from my grocery store.  The tomatoes will go in the pellets that you can barely see at the top right.


If you're using the pellets, you'll need to rehydrate them before you can use them.  To do this, place them in the container and add water. You'll probably need to add quite a bit of water.  Don't worry about adding too much--whatever isn't absorbed, you can pour off.  (And I did just that.)  These are what the pellets look like before water is added to them.


It will take a few minutes (around five or so) for the pellets to absorb the water and rehydrate.  As they are doing this, they will grow plump and taller. These grew to about two inches or so. (You may notice that I've used two different types of pellets. These are just the ones that were available at different stores when I purchased them.) 


Once they've stopped rehydrating, give them a good squeeze to loosen up any compacted insides.


You'll notice that there's a slight indentation at the top of each of the pellets.  Next, place one seed per pellet into the slight indentation.

Yes, it's a tiny seed.  Yes, you'll really only need one seed per pellet.  Really.

See the itty-bitty seeds on the top?  It's the tiny yellow dot.  (These are tomato seeds.)


Use a toothpick to gently press the seeds down into the pellets.  You don't need to go very deep--maybe just a smidgen.  After the seed is pressed down, use the toothpick to gently cover the seed.


Once all the seeds are pushed in and gently covered, you'll need to put the lids on your containers and place in a warm spot.  To start the seeds, you'll need warmth, but not light. You won't place the seedlings under lights until they've actually started to emerge.

Warm is really a relative term--I placed mine in the basement, next to an oil filled electric radiator space heater set on low.  The thermostat next to it read a consistent 62 degrees. 


Almost immediately you may notice the condensation starting on the lid of the container.  That's a good thing.  If you're planting more than one different seed type, you should label what you've started.  You can see I got all fancy-schmancy and used a Sharpee marker on Duct tape.

Now, comes the most difficult part.  Waiting.

Check your seeds every day and make sure that the container is moist.  There shouldn't be water pooling in the bottom of the container, but your pellets should be damp and condensation should be on the cover. 

In about a week, your seeds should start to sprout.  Here are mine after seven days.

Tomatoes from the seeds I harvested from last year's crop of Purple Cherokee and Pineapple Heirloom tomatoes.


Squash seeds


Once they've sprouted, it's time to get them under lights, which I'll cover in the next post.


Wednesday, March 7, 2012

Seeing the Potential: Stairs Before and After

Sometimes, it's difficult to see the potential.

Really difficult.

Such was the case with the stairs in my daughter's apartment.  The stairs originally had horrible, disgusting carpet on them and one evening, we decided to pull off the carpeting and were met with a gazillion staples and the horrible, disgusting stairs under the carpet.


Go ahead--say it.  EWWWW!!!!!

Most people would cry at these stairs.  But my daughter is...well, my daughter.  She has my genes.

Poor girl.

How about another Before pic of these awful stairs?  Can you stand it?  More EWWWW!!!!


Horrible, aren't they?  Okay, one more.  The After will be worth it, I promise.  See the marks on the side where all the gazillion staples were?  It took forever to pull them out.  Forever and then some.


 I promised After pics, and here they are.
After the staples were pulled out and the floor and railing cleaned, the stairs were painted with Sherwin Williams (SW6076) Turkish Coffee, the trim and baseboard received a fresh coat of white Olympic One Paint and Primer in One Satin Finish, and the walls painted with Sherwin Williams (SW 6759) Cooled Blue.


Much better, don't you think?


Perfect Price: Dresser Make Over

Sometimes we come across the perfect piece for the perfect price. 

Or the "could be perfect, but isn't yet" that's still the perfect price (free). 

Such is the case with this dresser that my daughter and I found at the side of the road, waiting to be carried off by the trash collector.  Luckily we got to it first.

You may not think we were lucky when you see the before pic, but we were.


Yes, it's a bit rough and tumble around the edges, but it's a solid (ie. heavy) piece, and hey, who could beat the price.

I'll remind you, it was a bargin for FREE! 

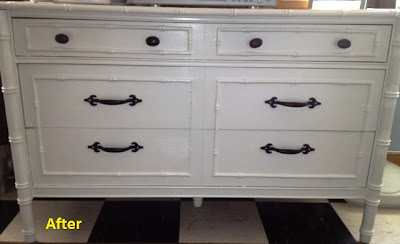
So let's take a look, shall we, to see what can happen with a coat of white paint, new handles and a bit of love.


It's like a completely new piece! 

Sorry, I don't have pictures and instructions--my daughter did this with her own creativity, but she tells me it was a result of a couple coats of white paint and simple change of drawer pulls from the hardware store.


The pefect price, indeed!